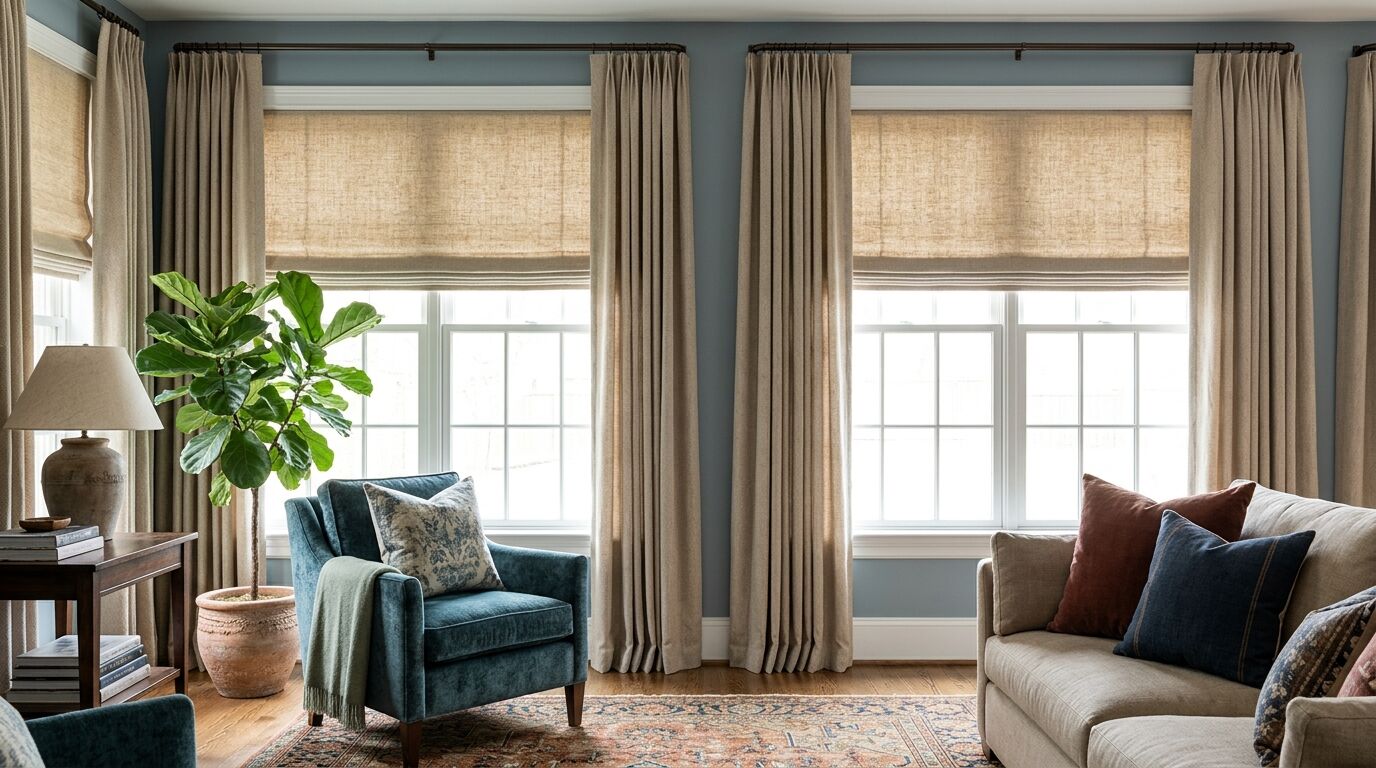
Drapery beside a shade is the detail that most often goes wrong in a new house, and it usually goes wrong the same way. The rod sits too low, the panels come out too narrow, and the window ends up looking shorter and darker than it did with nothing on it at all. Layering is worth doing. It just runs on proportion, and proportion has real numbers behind it.
- Decide what the shade is doing first. If it handles privacy and light, the panels can be stationary and the whole job gets lighter.
- Four to six inches above the casing is the minimum rod height. In a 10 foot room, go within two to four inches of the ceiling.
- Run the rod 6 to 12 inches past the frame on each side so the panels stack off the glass instead of over it.
- All the panels together should add up to about twice the width the rod covers in flat fabric. Sheers want 2.5 times.
- Hem within half an inch of the floor, or break an inch on it. The in-between length reads as a mistake.
- Only one of the two layers carries visual weight. Two heavy layers is what closes a room in.
Decide What the Shade Is Doing First
Every decision downstream hangs on this one. If the shade already gives you the privacy and the light control the room needs, then the drapery is there for softness, color and scale. Which means the panels never have to close. Stationary side panels get you the same look for less money and less hardware, and they leave the glass clear all day.
If the drapery does have to close at night, it becomes working equipment. Now you need rings or a traverse rod that actually slide, lining that hangs straight, and enough wall beside the window for the fabric to pile up when it is open. Different budget, different install.
Be clear about what your shade actually blocks, too. Room darkening and blackout are two different things, and even a true blackout fabric leaks around the edges of a roller or a roman unless it runs in side channels. Drapery will not patch that leak, because panels gap at the leading edge and along the top just as readily. Our post on room-darkening versus blackout shades walks through where the light really gets in.
Mount the Rod High and Wide
Two measurements do more for a window than the fabric choice ever will.
Height first. Four to six inches above the top of the window casing is the floor of acceptable, and it is where most people stop. In the newer houses around Prosper and Frisco, where ceilings run 10 feet and up, the better answer is to take the rod within two to four inches of the ceiling, or tuck it just under the crown molding. The eye reads the full drop of the fabric as the height of the window, so the higher the rod goes, the taller the wall feels.
Then width. Run the rod 6 to 12 inches past the frame on each side. People skip this because it looks strange on paper, and it is the move that does the most work in the finished room. Panels parked outside the frame leave the glass clear, so you keep the daylight you paid for and the window reads wider than it measures.
One detail ties the two layers together. Outside mount the shade a few inches below the rod and size it to the window frame rather than to the panels. The headrail disappears behind the top of the drapery, and the window reads as one treatment instead of two things hung near each other.
How Much Fabric a Panel Actually Needs
Narrow panels are the most common mistake in a layered window. A panel cut too skinny hangs flat as a board and looks like a towel on a rod.
The working number is fullness. Add up the flat width of all your panels and you want roughly twice the length of rod the fabric has to cover. Take a 72 inch window with the rod extended out to about 90 inches: you want somewhere near 180 inches of flat fabric across it, so two panels around 90 inches each. Sheers and lightweight fabrics want more, closer to 2.5 times, because thin cloth needs the extra gathering to look like anything. Heavy fabrics can sit nearer 1.5 to 2 times and still look generous.
The number nobody thinks about is stack. That is the pile of fabric sitting to the side when the panels are open. A common workroom estimate puts stack for lined custom panels at roughly 30 percent of the window width, and around 20 percent for unlined. On that same 72 inch window, lined panels need something like 22 inches of wall to stack into, about 11 inches per side. If that wall does not exist, because the window runs into a corner or a built-in, the panels will sit on the glass no matter how you cut the rod.
Do that arithmetic before you fall in love with a fabric.
Where the Hem Should Land
Three lengths look deliberate. Everything between them looks like an error.
Float. The hem stops a quarter inch to half an inch above the floor, close enough to slide a pencil under. Crisp, easy to vacuum around, and the safe choice on a floor that is not perfectly level. Most of our clients land here.
Break. One to two inches of extra length, so the fabric touches and folds slightly at the bottom the way a trouser breaks over a shoe. Softer, a little more formal. It needs a floor close to level, or one panel breaks and the one beside it does not.
Puddle. Two to six inches of fabric pooled on the floor. That is a formal dining room or a primary bedroom decision, and it is a commitment, because puddled fabric has to be rearranged after anyone walks past it.
What fails is the accidental middle. Two or three inches of daylight showing under the hem makes an expensive panel look like it shrank in the wash.
One thing worth knowing on a new build: engineered wood and tile are not always dead level across a long window wall. Sheila measures the drop at every panel position rather than once in the middle, because half an inch of slope across a 12 foot wall is obvious once the hems are supposed to match.
Keeping the Room From Feeling Heavy
Weight comes from stacking two substantial things on top of each other. The fix is to let one layer be quiet.
Pick which layer is the interesting one. A woven wood or a textured roman under plain solid panels works. So does a flat, quiet roller shade under patterned or heavier drapery. Pattern against pattern at the same window almost never settles down.
Keep the two layers within a few steps of each other in tone. A dark panel hard against a bright white shade cuts the wall into stripes and shortens it. Panels a shade or two off the wall color recede, and the window keeps its height.
Scale the hardware to the room. A chunky two inch rod with heavy finials, thick lined drapery and a substantial shade will close in a 12 by 12 bedroom. Thin the rod, drop the lining, or leave the drapery out of that room. On a two-story great room wall the opposite problem shows up, where a slim rod on a 20 foot elevation reads like a pencil line.
And leave the sides of the window alone. Every inch of fabric parked over daylight is weight you did not need to buy.
When to Skip the Drapery
Layering is not automatic. Some windows are better with one treatment, and saying so has saved plenty of our clients money.
Windows that run into a corner, a bookcase or a fireplace surround. There is nowhere for the panels to stack, so they end up covering glass. A single panel on one side can work, but only if the room is asymmetrical on purpose.
Kitchen windows over a sink or near a range, where fabric collects cooking film and has to come down to be cleaned. A shade wipes; a panel goes to the cleaner.
Bathrooms and laundry rooms with real moisture in the air.
And rooms where the window covering is already the architecture. A run of plantation shutters is a built-in feature with its own frame and lines, and operating drapery over it fights the louvers every time it closes. If you want fabric in that room, keep the panels stationary and hang them clear of the shutter frame.
Getting the Numbers Right on Your Own Windows
Every rule above is a starting point the room then adjusts. Ceiling height, where the crown lands, how much wall sits beside the glass, which way the window faces and how level the floor actually is all move the answer.
That is the part worth having measured in person. Custom panels are cut to your drop and cannot be returned, and a rod set three inches too low is not something a longer hem can fix later. Sheila comes to the house, looks at the window in its own light, and works out rod height, panel width and hem together with the shade going behind it. You can see finished rooms in the project gallery, and the headings, linings and hardware options on our custom drapery page. When you want numbers for your own windows, book a free in-home consultation.
See it in your own light.
Every room measures differently. Sheila comes to your home, looks at your actual windows and light, and helps you choose what fits. No showroom pressure, no obligation.
Book a free consultationProduct options, pricing and lead times vary by manufacturer and by window. Details here are general guidance — your in-home consultation is where we confirm what actually fits your home.